

Crisp white snow, a warm fire and cozy sleeping quarters — winter camping in Canada is the new winter escape (especially this year).
The perfect set up and gear are key when taking to the wintery outdoors, and once you have your home base geared up with all the necessities, winter camping in Canada is something special (and really not as extreme as you may think). That said, it requires extra care and attention than when camping in warmer weather.
Take full advantage of the season with these camping in Canada winter tips.
Choose your tent size wisely
When it comes to winter camping in Canada, size does matter. We recommend going for a small to medium-sized tent for the highest performance against the winter elements. On the flip side, you’ll want to make sure the tent is big enough to accommodate a stove and hold all your gear (as there tends to be more in the winter).
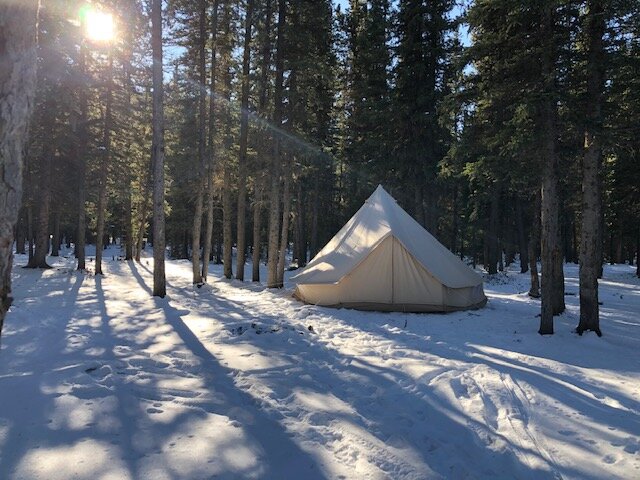
The 400-500 Pro or ProTech models would be our top choice for winter camping. While the 600 model also works for winter camping, the larger surface area presents a greater risk of compromising stability. This is a general rule of thumb no matter the season, but it’s even more important when it comes to snow accumulation. The same goes for single versus double tent doors: the additional door decreases the overall strength of the tent.
Similarly, the Ultimate models can be used for winter camping, but you need to take extra care due to the lighter weight canvas and lower level of UV/mold protection applied.
Size also matters when selecting the right tent stove. And it’s not rocket science that the larger the tent, the higher output of energy that is required (we will talk more about this in a moment).
Check out all the available tent models here.
Go for a steep, sloped canopy
It’s all about minimizing snow accumulation, and a steep slope means less snow load. It also makes it much easier to clear the snow off with a brush. Hint: Use a car brush to get rid of snow and ice. Works like a charm.
Opt for thick, four-season canvas
A thick canvas will keep the heat contained in your tent, and high-quality treatment will protect the canvas against the elements all year round (sun, snow, moisture, mould — you name it).
Our Pro and ProTech models, for example, are built for winter because of the thickness of the canvas and its four-season treatment.
Preparation is key: gear up
Apart from the essential snow wear and cook ware, don’t forget to bring a shovel, snow shoes, a broom (to sweep out snow from inside the tent) and towels (to dry melted snow — and cold feet — inside the tent).
As we mentioned, your car brush will be great for removing snow from the top of your tent. Also, a drill is amazing for getting pegs into frozen-solid ground (see tip on pitching in the snow below).
Another highly recommended must have? A blow torch blowtorch to get your fire going (there’s no shame in it). And you can use it as a party trick to flambe your food.
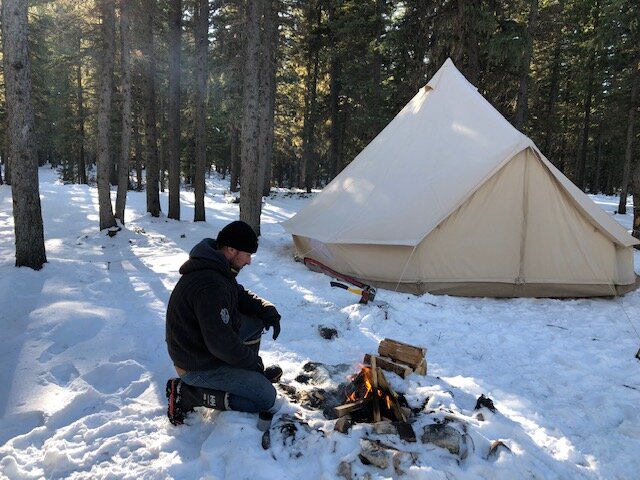
Get a tent stove
A real game changer, a tent stove will not only heat your tent but offer a ton of other benefits during winter (and shoulders-season) camping. The heat will inevitably help to melt snow off your tent, you can cook meals inside, you can quickly dry your gear — yes to warm, dry socks and boots — and it will help to keep critters away. A tent stove is also safer than an outdoor fire pit (less likely to cause a forest fire). And not to mention the ambiance factor.

(Note: we may be stating the obvious here but will say it anyway: never, under any circumstance, should you have an open fire in your tent.)
Opt for top stove ventilation
If you are using a stove, both side and top ventilation will work, but top ventilation will make the tent warmer because it heats from the middle outwards. This is especially important if you’re camping in the peak of Canadian winter.
Here’s how to install a tent stove jack:
Search for a spot that appears to be flat, then start stomping (snowshoes help). Flattening the snow then letting the sun melt it slightly, which will freeze and harden, creates a surface ideal for a solid pitch. This reduces the risk of the centre pole sinking into the snow (due to soft snow and the tension of the guylines) and avoids compromising the stability of the tent, especially as snow accumulates.
Also, the best spot will not only be flat, but will have tree covering to protect from the winter wind. In conducting field tests in the Rocky Mountains, the CitizenCanvas team quickly discovered that pitching a tent on a vast plane with picturesque views of the mountains may seem like a good idea, but the hard ground from the cold winds makes it nearly impossible. Opt instead for a cozy spot past the tree line.
Know how to pitch in different levels of snow
While our Pro Pegs and Stakes are built for tough, rocky ground, when the ground is frozen in the winter, you may experience difficulty getting them deep enough to secure the tent in winter winds.
So, two options:
1) If you are in shallow/manageable snow (one foot or under), we recommend bringing a power drill to drill holes in the ground for the pegs and stakes — works like a charm!
2) If the snow is deep and the ground is not easily accessible (even after you stomp and flatten all that snow), dig pits into the snow for each guyline. Place a good-sized log vertically into each pit with paracord centred beneath them. Cover with packed snow, with the ends of the paracord above snow level and let freeze for about an hour. With a simple half hitch knot of the paracord, you now have something ultra-sturdy to tie your guylines to.
This video explains it best:
And know how to pack up properly
When you're packing up a canvas bell tent, we suggest separating the canvas from the groundsheet, as it will likely be difficult to get the groundsheet totally dry
in the winter (and you don't want the canvas touching the wet groundsheet while in storage).